Skip to content
If your bathroom has seen better days, you are likely looking for ways to spruce it up. For many homeowners, the obvious choice is to put in a new floor.
Bathroom floors are known for their use of tile. While the majority of tile is beautiful and durable, it can definitely show its age. It may be time to replace your tile if:
- Multiple tiles are cracked
- Tiles are lifting off of the floor or completely missing
- The grout is discolored
- The tile is stained
If any of those sounded familiar, you are in the right place! We’re going to teach you how to tile a bathroom floor from start to finish. Whether you are a beginner DIYer or a seasoned pro, we have the tips you need to transform your bathroom.
Benefits of Tile Floors ✅
Tile flooring has been the go-to choice for bathrooms for decades. But what is it about this particular flooring material that has stood the test of time? Here are some of the biggest benefits of installing bathroom floor tiles.
- Durable – Floor tile is known for its ability to take a beating. In a high-traffic room like the bathroom, that is a definite plus. Ceramic tile is as hard as granite and can last a lifetime if properly installed and maintained.
- Hypoallergenic – Bathrooms are high-moisture areas. This can lead to a variety of problems for your respiratory system, including mold and mildew growth. A tile floor is resistant to mold growth and will not be damaged by water.
- Aesthetically Pleasing – While tile has a lot of practical benefits, many people choose it specifically because it is beautiful. Tile is infinitely customizable, with designs and shapes to fit every style and taste.
Downsides of Tile Floors ❌
Despite all the benefits, tile does come with some downsides. It is wise to consider these before deciding to replace your existing tile.
- Maintenance – While tile is fairly low maintenance, day to day, it does require some yearly upkeep in order for it to stay fresh. Usually, this comes down to taking care of the grout. Whether you decide to seal the grout or not, it can become discolored and dirty unless it is properly cleaned. Cleaning the grout is a time-consuming task, though, and not every homeowner will be up for the challenge.
- Cost – While no flooring is exactly cheap, tile can quickly become a pricey flooring option, depending on the style that you choose.
Is Tile DIY Friendly? 🤔
If you are a dedicated DIYer, you’re probably eager to do as much of your bathroom renovation as you can by yourself. But is tiling your bathroom floor a good project for a DIY homeowner?
The short answer? Sure, go ahead. You can absolutely tile your floor by yourself, and we will teach you how. That being said, tiling a floor is a time-intensive home improvement project that requires you to be precise and work quickly. If, after reading about tile installation, you don’t feel 100% confident, we always recommend hiring a professional. The peace of mind that you receive will always be worth it.
Tools Needed ⚒️
If you are planning to tile your floor the right way, you’ll need the right tools! The tools you’ll need include:
- Tile cutters
- Chalk line
- Caulk gun
- Bucket
- Putty knife
- Scoring knife
- Safety glasses
- Knee pads
- Dust mask
- Drywall saw
- T-Square
- Tape measure
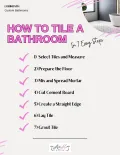
7 Steps to Tile a Bathroom Floor
Ready to tile your floor? Follow these steps for flawless results that you will love for years to come.
1) Select Tiles and Measure
Before you pull out your tools, you must choose your tiles and create your tile layout! Make sure to thoroughly measure your bathroom floor to ensure that you order the correct amount of tile. It is better to have leftover tile than to have too little!
2) Prepare the Floor
The next step is to prepare. If you have existing tile, this means that you will have to remove it. Once all tile has been removed, you can then clean the floor of any remaining debris. Remember: starting with a smooth surface will yield you a better result in the end.
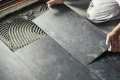
3) Mix and Spread Mortar
You will then want to mix a batch of thin-set mortar. When deciding how large of a batch to mix, keep in mind that it will dry out after about an hour. Only make as much as you are certain that you can use.
Once it has been mixed, you can begin spreading a thin layer of thin set mortar onto your subfloor. Using a notched trowel will ensure that the mortar is spread evenly.
4) Cut Cement Board
Many homeowners choose to reinforce their floors by using cement board. If you choose to do so, now is the time! Carefully cut the cement board before scoring it with a utility knife. You can then place it on top of the thin-set mortar.
Once your cement board has been placed, use roofing nails along the edge to secure it. You will then want to wait two days before laying the tile.
5) Create a Straight Edge
While your walls may look straight to the untrained eye, the truth is that walls may not be as straight a line as you’d want them to be when it comes to laying tile. Instead, we recommend creating a straight chalk line that will help you feel confident.
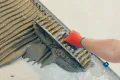
6) Lay Tile
It’s the moment you’ve been waiting for! After spreading another layer of the thin set onto the cement board, it is time to lay your bathroom tile. Start in the furthermost corner of the room, and slowly work your way towards the door. Spread your mortar in small sections to avoid having it dry out. You’ll want to place spacers in between your tiles in order to ensure that they are evenly spaced.
After placing your tile, press down firmly to eliminate any air bubbles underneath. It’s also a good idea to periodically check your tile placement with a level. Lay the level directly on the tile surface to ensure it is placed flat on the ground.
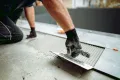
7) Grout Tile
After allowing the mortar to dry for a day, you can begin to grout your tile. Remove your tile spacers, and slowly spread the grout along the grout lines. You’ll want to move in small sections and wipe away the excess grout with water and a large sponge as you go.
Allow your floors to dry for 2 days, and then you are ready to go! Homeowners also have the option to use a grout sealer at this point if they wish.
Leave It to the Pros! 📱
Feeling overwhelmed? Let our team at Lori K Bath help you out! We are experts in all things bathroom renovation related. We can tile your entire floor in a matter of days so that you can get back to living your life. Contact us today for a free quote!